1. 제너레이터란 무엇인가
1.1 제너레이터 함수의 정의
제너레이터는 실행을 멈췄다가 다시 시작할 수 있는 함수다.
function* gen() {
  yield 1;
  yield 2;
  yield 3;
}
function*: 제너레이터 함수yield: 값을 반환하면서 실행을 중단
1.2 일반 함수와의 차이
function normal() {
  return 1;
}

function* generator() {
  yield 1;
}

normal();      // 1
generator();   // 실행 ❌ → 제너레이터 객체 반환 ⭕
👉 제너레이터 함수는 호출해도 실행되지 않는다.
2. 제너레이터 객체의 정체
2.1 이터러블이면서 이터레이터
const g = generator();

typeof g.next; // "function"
Symbol.iterator in g; // true
- 이터러블:
for...of가능 - 이터레이터:
next()를 가짐 - 자기 자신이 자기 이터레이터
2.2 next()의 반환값
g.next(); // { value: 1, done: false }
g.next(); // { value: undefined, done: true }
value: yield 또는 return 값done: 종료 여부
3. 제너레이터의 핵심: 일시 중지와 재개
3.1 yield는 무엇을 하는가
function* gen() {
  console.log('A');
  yield 1;
  console.log('B');
  yield 2;
}
const g = gen();

g.next(); // A 출력, { value: 1, done: false }
g.next(); // B 출력, { value: 2, done: false }
👉 yield는 return이 아니라 “중단 지점”이다.
3.2 next(value)는 어디로 전달되는가
function* gen() {
  const x = yield 1;
  const y = yield x + 10;
  return y;
}
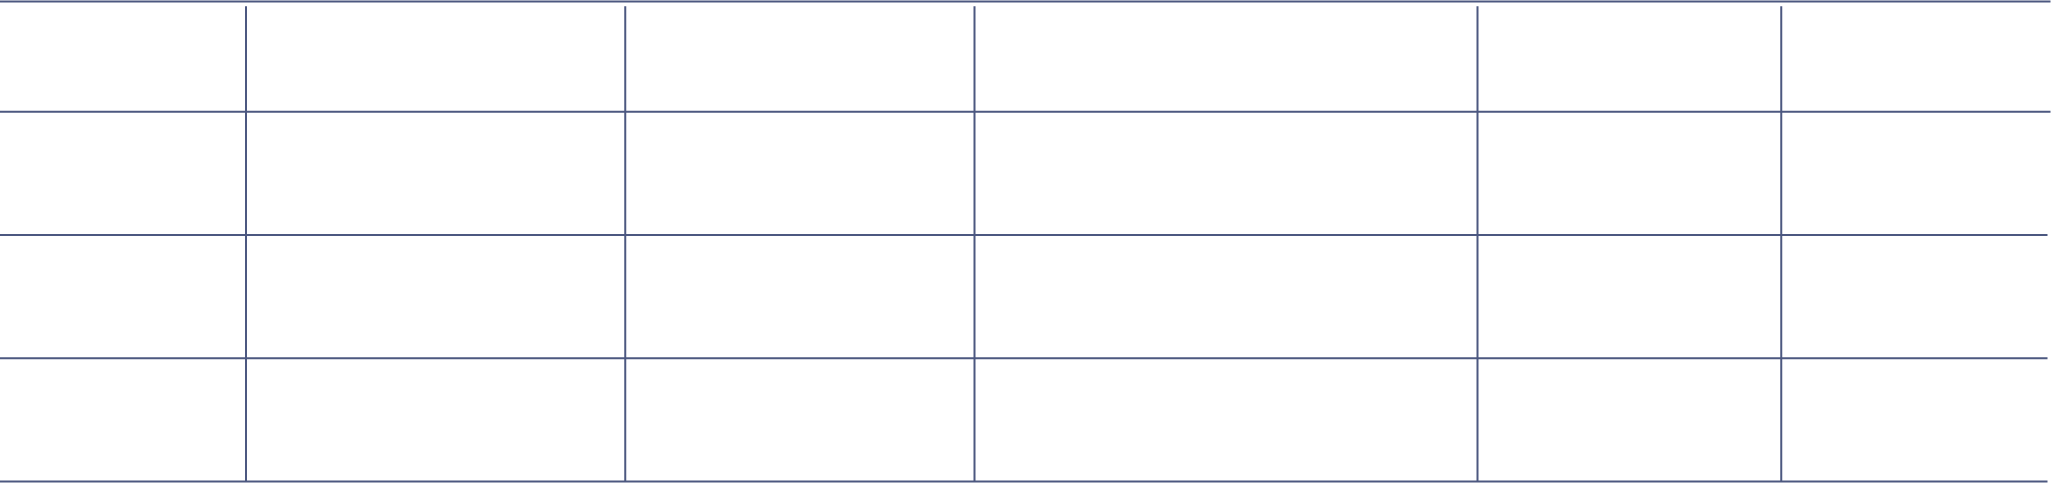
Generator Execution Flow
JayTak
👉 next의 인수는 “이전 yield의 결과값”이 된다.
4. 제너레이터의 활용
4.1 이터러블 구현을 단순화
// 1. 기존방식
const iterable = {
  [Symbol.iterator]() {
    let i = 0;
    return {
      next() {
        return { value: i++, done: i > 3 };
      }
    };
  }
};

// 2. 제너레이터 사용
function* iterable() {
  yield 0;
  yield 1;
  yield 2;
}
👉 이터레이션 로직이 눈에 보인다.
4.2 제너레이터로 비동기 흐름 제어
function* fetchTodo() {
  const response = yield fetch(url);
  const todo = yield response.json();
  console.log(todo);
}
여기서 yield는 Promise를 반환하고, 외부 실행기가 Promise가 resolve되면 next()로 다시 밀어 넣는다.
result.value.then(res => onResolved(res));
👉 이 구조가 async/await의 원형이다.
5. async/await의 등장
5.1 async/await는 제너레이터의 상위 추상화
async function fetchTodo() {
  const response = await fetch(url);
  const todo = await response.json();
  console.log(todo);
}
Comparison of function* / yield and async / await
JayTak
5.2 async 함수의 본질
async function foo() {
  return 1;
}

foo().then(console.log); // 1
- async 함수는 항상 Promise를 반환
- return → resolve
- throw → reject